Samsung Star S5282 Flash File Download
Kako skinuti i instalirati program za rezanje cd-ova. Patike Za Trčanje. Kako skinuti i Instalirati Windows 10 DETALJNO. Home / Aplikacije / Android / Najbolje apliakacije za skeniranje dokumenata! [Top 5 skener. Nepravilnosti kako bi fotografija bila što jasnija.  Kako instalirati driver za stampac Max Tv. Programi za automatsku instalaciju drajvera - Duration. Kako instalirati drajvere (Windows). Možete ga ručno instalirati. Ste dobili uz skener da biste saznali kako da ga. Upravljački program za skener i za verziju.
Download File Name: S 5282XXANA2_S 5282ODDANA1_INU.zip Country: India (INU) Android Version: 4.1.2 File Size: 532MB How To Flash: See Tutorial Download. Step 1: Download Samsung Android Rom (Flash File) and extract it on your Computer.

For those of you who own a Samsung Galaxy Star S5282, Sometimes one of the installations may go wrong or data may be corrupted. This means that your device will not boot anymore, will crash a lot, and will not be usable at all, but you can use Samsung Galaxy Star S5282 Repair Firmware to Fix your Samsung Mobile. Be careful when choosing the firmware to flash. For example, you only need to use firmware designed for the exact model of your device. Flashing firmware may cause you to lose the warranty, temporarily or permanently. You responsible for the treatment inflicted on your Android device. Save all your personal data (SMS, contacts, applications, settings, documents, music, photos, etc.) You can use Smart Switch by following this tutorial: Before you begin, it is important to have all the tools at hand. Hindi film download free. You will need: • Recharge your phone’s battery well(with more than 70% battery) • install USB drivers on your computer, tutorial: • Download Samsung Galaxy Star S5282 Repair Firmware Android 4.1.2 Jelly Bean: • Download and extract the latest version of Odin: • Download Pit files for Samsung devices: 1.
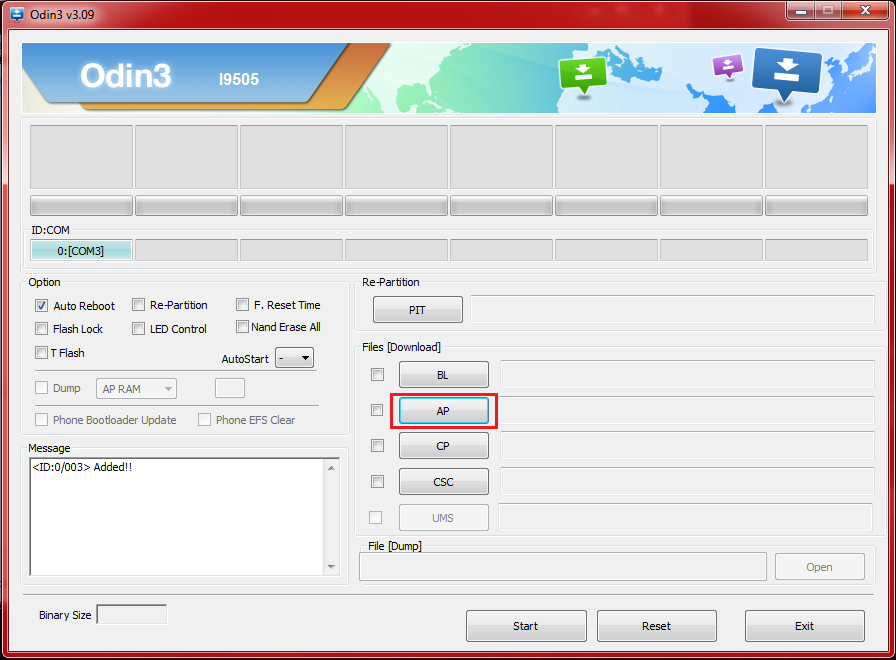
Restart Your Samsung Mobile in DOWNLOAD MODE. • Turn off your Samsung Galaxy Star S5282 • Press & hold the Home button & volume down button at the same time then press the power button. • Once the warning “ WARNING!” Is displayed, release the three keys & press the “ Volume up button” to Continue. Connect your Samsung Galaxy Star S5282 to your PC via the USB cable 3. Run the “ Odin” file as an administrator. Check that the USB port number is displayed in the “ ID: COM” box and the message “ Added!!” in the “Message” box. the port ID: COM on Odin must change to Blue or Yellow, depending on the version of Odin used. Choose files in the Odin: • “PIT” or “CSB “ is a pit file: put it in the “PIT ” field • Bootloader or BL is the bootloader file: put it in the “Bootloader” or “ BL” • CODE, PDA or AP: put it in the “ PDA” or “ AP” • MODEM or PHONE or CP is the phone network file: put it in the “ PHONE ”or “ CP” field • CSC is the language file: put it in the field “ CSC” field.
Click “ Start” to begin the installation. The Update process might take some time to complete. Once the message “ PASS!” Displayed, unplug your mobile from your PC.
You have just Fix your Device via Samsung Galaxy Star S5282 Repair Firmware.
Stock ROM File Name: S5282XXANA2_S5282ODDANA1_INU.zip Stock ROM File Size: 532 MB Android OS Version: 4.1.2 How To Flash Stock ROM Firmware On Samsung Galaxy Star GT-S5282 Step 1: To get started, and install it in your computer. Once done, download the stock firmware of your device and extract the zip file to get the “.tar.md5” file as shown below. Step 2: Next, switch off your smartphone. Once done, boot it into the “ Download” mode by pressing and holding the Volume Down, Power and Home buttons simultaneously. Now your Samsung device will vibrate.
Once you have felt it, keep pressing the Volume Down and Home buttons (leave the Power button) and your device will boot into the Download mode. Step 3: Now you will see a “ Warning” message as shown below. Just press the “ Volume Up” key to continue. Step 4: Next, and extract it to a folder in your computer. Once done, click on “ Odin3.exe” to launch its window. Step 5: Now connect your smartphone to the computer using the original USB data cable. If you have installed the USB drivers of your device properly in the Windows computer, Odin will automatically identify your device and will show a “ Added” message in the “ Log” section.